If you're like most modelers,
you've probably accumulated quite a number of small bottles of paint.
This project is a takeoff of several commercially available paint caddys.
Those are okay, but they are somewhat limited in the number of bottles
of paint they can store. So let's put together a caddy that will accommodate
about 75 bottles in the most common 1/4 and 1/2 ounce sizes.
|
|
What you'll need...
Tools
and supplies needed for this project include:
-
2
sheets foam board (20x30 inches)
-
1
sheet poster paper or other lightweight card stock
-
Household
revolving turntable
-
White
glue
-
Masking
tape
-
Compass
-
Hobby
knife with a sharp blade
-
Metal
ruler
You'll be able to find
all of this in most larger discount department stores. |
|
Step One
The first thing we'll do is make a pattern. The dimensions
here are only guidelines; you can change them to suit your own particular
needs. Using the compass, draw a series of concentric circles on
the poster board with the following diameters:
- 13 1/4"
- 10 1/2"
- 7 3/4"
- 5 1/8"
- 2 1/4"
|
|
|
Step
Two
Use the hobby knife to
cut out the circles. |
Step
Three
Next, tape each of the pattern
circles to the foam board and draw around both the inner and outer
edges. For the largest first tier of the caddy, you'll need only one;
for all the others, draw two copies on the foam board. |
|
Step
Four
Next, use the hobby knife
to cut out all the circles, only on the
outer edges. You should wind up with one circle 13 1/4" in
diameter and a pair of circles in the other sizes, 10 1/2",
7 3/4", 5 1/8", and 2 1/4".
The inner lines you've
drawn using the pattern will be used later on for aligning the tiers
when we put everything together. |
|
Step
Five
The household revolving
turntable will probably have two shelves. We'll only be using the
bottom section. Use the white glue to attach it to the largest of
the foam board circles, being careful to center it.
|
|
Step
Six
Next we'll make the rest
of the tiers using one each of the remaining foam board circles.
Cut several strips of foam board 1 3/4" in width. Then cut
support braces from the strips in lengths to match all of the other
foam board circles, one each:
- 10 1/2"
- 7 3/4"
- 5 1/8"
- 2 1/4"
Use the white glue to
attach the brace strips across the center of each of the foam board
circles. Hold the assembly together with masking tape as shown.
The masking tape can be left in place for extra strength. |
|
Step Seven
Now add two additional
brace strips perpendicular to the first brace. The additional strips
should be cut to the proper length so that they come to the edge
of the foam board circle as shown. Repeat this process for all of
the remaining foam board circles. |
Step
Eight
Now glue the remaining foam
board circles to the previous assemblies, being careful to align them
carefully. You can use a book or something similar to apply some weight
to the tops and keep them tightly bonded to the support braces while
the glue dries. When you're finished, you should have four tier assemblies
as shown in the photo on the right. |
|
Step Nine
Now cut a couple of 3/8"
wide strips from the poster paper / card stock, long enough to go
around the edge of the first foam board circle / turntable base
assembly. Glue the strips in place, positioning them so that they
are flush with the bottom edge of the foam board circle. The strips
will extend beyond the upper edge of the foam board to create a
lip that will keep the paint bottles from slipping off. Secure the
strips in place with pins until the glue dries. |
|
Step Ten
Then cut several additional
2 3/8" wide strips from the poster paper. Glue these strips
to the remaining tier assemblies, flush with the bottom edge, and
extending above the top edge as shown. Hold everything together
with pins until the glue dries. |
|
Step Eleven
Now it's time to assemble
all the tiers together. Glue everything together "wedding cake"
style, centering each tier with the one below using the inner circles
we drew to align everything. Again, use a book or something similar
to weigh everything down and ensure a tight bond until the glue
dries.
To add additional strength
I also applied a bead of glue around the lower edges of each tier
where they joined to one below, and also around the lower inside
edge of the protruding lips.
Once everything is dry,
you may want to apply a light coat of paint to the finished caddy. |
|
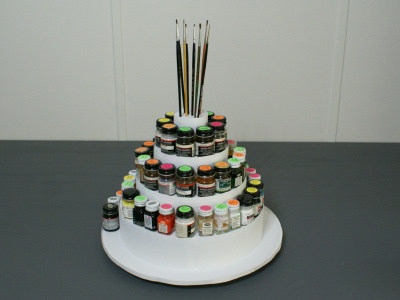
Step Twelve
And here's the finished
product. Plenty of room for all the bottles of paint I had on hand
plus room for more.
But wait!
What about the smallest tier? I planned to use it to hold
the 2 oz. bottle of paint thinner I always keep on hand. But there's
another option... |
Step
Thirteen
Use a sharp tool such
as an icepick to punch holes in the top of the smallest tier. Presto!
Now you have a place to store paint brushes. |
|